Welcome to my pattern Blog

This blog is for the patterns for items shown on my blog

Margarets designer cards.blogspot.com

My blog is a show case for my cards, Knitting, Tatting, Lace Knitting, Parchment Craft and anything else that just happens to pop by.


Wednesday 3 June 2020

Poker Butterfly Heart


Poker Butterfly Heart

Designed by Margaret Davies © 2020

This pattern came about in Lock down playing  Virtual Poker tatting,  by given a set of poker cards,  we were asked to design a piece of tatting,  this is what I came up with.


Abbreviations
-           Picot
+   -      Join
Vsp -  very small picot
JR  -  Josephine ring,  the numbers beside are the stitches count for the JR
CTM – continuous thread


I suggest two shuttles CTM for this pattern, I used size 20 thread but it’s up to you what size you use.  As you tat the chains the butterfly will stand up making it 3d.  At the beginning of every chain do a very small picot so you can join the next chain

Butterfly
1st ring            10 – 6 – 4
2nd ring           4 + 6 – 6 -4
3rd ring            4 + 6 – 6- 4
4th ring            4 + 6 – 10
do not break off thread

Heart

This starts at the top of the butterfly
1st chain  20 + (join to 2nd ring) vsp 5 – 5 + (join to 3rd ring) vsp 20 + (join to top of butterfly) v
2nd chain 25 + (join to p on 2nd ring) vsp 7 – 7 + join to 3rd ring) vsp 25 + (join to top of butterfly) vsp
3rd chain 28 + (join to p on 2rd ring) vsp 9 – 9 + (join to p on 3rd ring) vsp 28 +   (join to top of butterfly) vsp
4th chain  7 JR10, 5 JR10, 5 JR10, 5JR10,  5JR10,  7  + (join to p on 2nd ring)  6 JR10,  6 JR20, 6 JR10, 6 + (join to p on 3rd ring) 7 JR10, 5 JR10, 5 JR10, 5 JR10, 5 JR10, 7 + join to top of butterfly.

In the picture I did a spiral chain so it could be hang up, but this is optional, I added a small piece of thread to the butterfly for the antennas.

Feel free to use the pattern for personal use or to sell items made from it, but not to sell the pattern as if it was yours.  Please credit me as the designer of the pattern


Link to the poker game http://tatyourownadventure.wordpress.com


Sunday 31 May 2020

Hidden Rose Ice Drop

Hi
This is a free pattern please enjoy
Hidden Rose Ice Drop

Adapted by Margaret Davies © 2020
Original Pattern called Hidden Rose Snowflake
By Muskaan © 2019


Abbreviations
-           Picot                                                                   
Vsp  -   Very small picot
+      -     join
R     -     Ring
CTM – Continuous thread
SS    -     Switch shuttles
RW  -     Reverse work
Dnrw  -  do not rw
TW -      Turn work
LJ     -      Lock join
                                                                                                                                                                                        
This is a variation of the pattern designed by Muskaan, which I have adopted into an ice drop

All picots are normal and some are multiple joins in the same picot
Lock chain is worked with the first half stitch flipped and second half stitch unflipped

1st Row     Ring 4-4---4-4 RW
                  Ring 6-6-6 fold down and away from you

The following is part of Muskaan pattern

1st ring  8 - 8 SS (base ring)
2nd chain   slip paper clip on SH2 thread to hold the picot, 12 tw SS
3rd chain    p3,   ring 5,   chain 3,   ring 8,  chain 3,  ring 14,  chain 3,  ring 8,  chain 3, ring 5,      chain 3.turn work SS.
4th chain  slip paper clip on Sh2 thread to hold picot, 12 + (join to base ring)
5th chain  8 + (join to p on 4th row) turn work
6th ring     8 – 8 SS
7th chain 10 + (join to 6th ring p)
8th chain  8 + (join to base ring)

Chains 5, 7 and 8 can be done in either a lock chain or an ordinary chain.

Repeat 1 row again and repeat the pattern until you have 6 repeats joining on the last repeat to the first set of rings and pattern.


This is the sequence of the pattern to help you,   the ice drop rings hang down from ring one.


Hanging

Make a hanging chain in the same thread using a spiral chain or any other method you want to use to the required length you want.

Feel free to use the pattern for personal use or to sell items made from it, but not to sell the pattern as if it was yours.  Please credit me and Muskaan as the designers when referring to the pattern.

Sequence drawing with kind permission from Muskaan

Links to Muskaan’s Blog   http://tipsaroundthehome.blogspot.com.


Sunday 8 January 2017

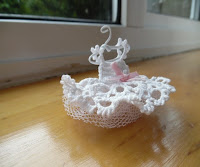
Pinterest Tatted Dress Pattern

Tatted
Dress
This pattern was from a picture I found on Pinterest for a challenge and I have produced this dress from the picture. There was no pattern on Pinterest for the dress so this is my interpretation of how the dress was tatted, and this is my written pattern from dress I produced.

I used No 5 thread to make this dress, I found the thinner threads do not work with this pattern, but it’s up to you what thread you try. 


Two shuttles or ball and shuttle whichever is your preference

Abbreviations
-           Picots
-          +  Join to picots
-          Vsp  very small picots used for joining.

The dress pattern starts at the top and works downwards

1st row  chain start with a paper clip 2-2-2-2-2-2-2 vsp 5 vsp 5 vsp 2-2-2-2-2-2-2 vsp 5 vsp 5          vsp Join at the paperclip

2nd row chain  2 + join to the 1st vsp (you now have the 1st strap for the dress) continue with         5 +(join at the next vsp), vsp 5 + (join at the next vsp) vsp, 2 + (leave the next part of the chain with the 6ps) (join at the next vsp), vsp 5 + (join to next vsp) vsp 5 + (vsp       join to the beginning of the 2nd chain.  You now have two straps with chains in        between which will form the body of the dress.

This starts the block part of the dress

1st row *  vsp 5 + (join to 1st vsp) vsp 5 + (join to next vsp)   vsp 5 + (join to next vsp) vsp 2         + (join to next vsp) vsp 5 + (join to next vsp) vsp 5 + (join to next vsp) vsp 2 + join    to beginning of row *

*Repeat until 7 rounds are made.

9th row  2- x 3 join to vsp repeat all the way

You can either do a split ring to next row or end off and start again

10th  row  start with a split ring 2-2/2-2 chain 2-2-1-1-2-2 ring 2+2+ (join to pervious row) 2-2 repeat all the way around to end
11th row  ring 2-2+2-2  *chain 1-1-1-1-1-1  ring 2+2+2-2 * repeat to end

Add either a bow or a flower on the waist of the dress.

A small strip of net folded in half and then stitched into the skirt inside is you wish,  this will keep the skirt full.


Saturday 17 March 2012

Saint Patricks Day Shamrock Earrings

Hi,
I have been given permission from Rachel of Piney Woods Tatter Blog to print the shuttle tatting pattern for her earrings. The original Pattern was for Needle tatting which I have worked out into a Shuttle pattern.

You need:-
One Shuttle with whatever colour thread as its shamrocks green would be the colour.
One bead per earring
ds - double stitches
vsp - very small picot

Put one bead on the thread and take a long end from the Shuttle, this will be used for the chain at the beginning and saves joining the ball onto the shuttle.
With the bead at the end work a chain of 7 ds.
Ring 15ds vsp (roll the ring around in your hand so you are working on the other side of the ring) 5 ds vsp 5 ds join to the first vsp this makes a small ring which you pinch together ( I found that be putting a vsp it bent easier) now roll the ring back so you are working on the same way as the first half of the ring 15 ds close ring. By rolling the ring in your fingers you can tat both side of the ring and the small ring will look as if you have done another ring inside the ring. I am wondering if I have found a new method of doing two rings together. Let me know what you think. Repeat twice tie and cut.

For a four leaf shamrock repeat ring three times.

Put earring clip in the top of the middle dimpled ring.

I hope you enjoy making these earrings.

Margaret